QuickStart Guide
The following instructions will assist with installing and configuring Flex Terminal Emulator for first time use:
System Requirements
Ensure the PC where you are installing Flex Terminal Emulator meets the minimum System Requirements.
Installation
Flex Terminal Emulator is delivered as a self-extracting zipped executable (*.exe) file or Microsoft installer (*.msi) file and is now available only as a 64-bit installer.
Follow the steps below to install Flex Terminal Emulator on an individual Windows desktop:
- Run the downloaded EXE or MSI file, which will launch the Flex Terminal Emulator setup wizard.
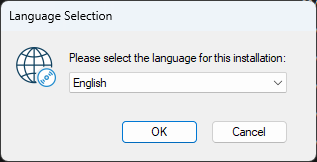
- Select the language to install, where English is the default (EXE only):
- Press Next to continue:

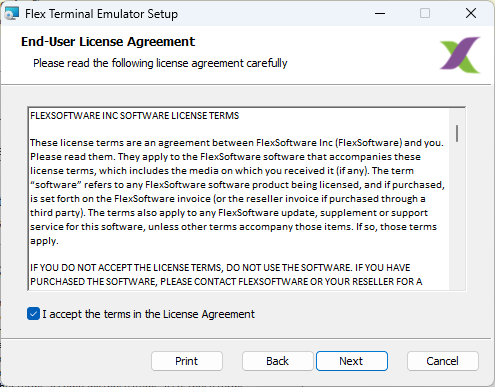
- Review and accept the license agreement terms by checking the box and pressing Next:
- Enter your User Name, Organization and License Code then press Next:
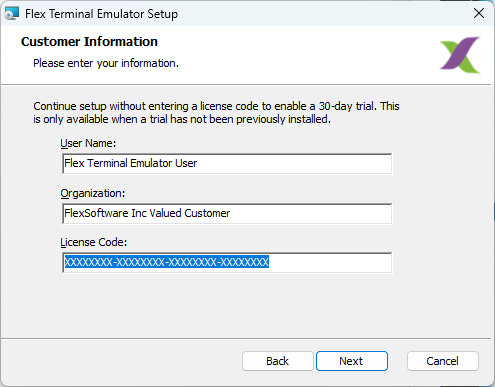
Note: If you are installing Flex Terminal Emulator for the first time for evaluation, leave the License Code field empty. This will automatically activate a 30‑day trial. The trial provides full access to all features and functionality of Flex Terminal Emulator on a Windows Desktop operating system.
If you plan to evaluate the software on a Windows Server system, you must contact the FlexSoftware Sales team to obtain a server‑based license code. You can reach them at 800‑835‑3975 ext. 1 or sales@flexsw.com. Attempting to run the software on a Windows Server without the proper license code will result in an invalid license code error.
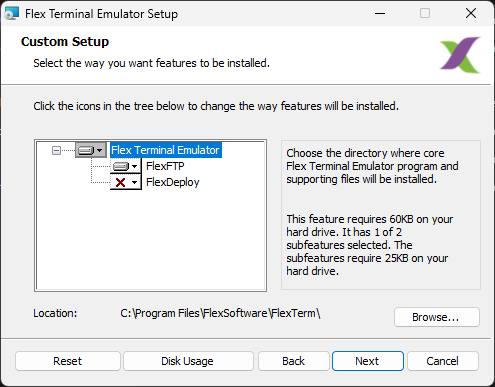
- Press Next to accept the default location (recommended) for the Flex Terminal Emulator application, or optionally Browse for an alternate location:
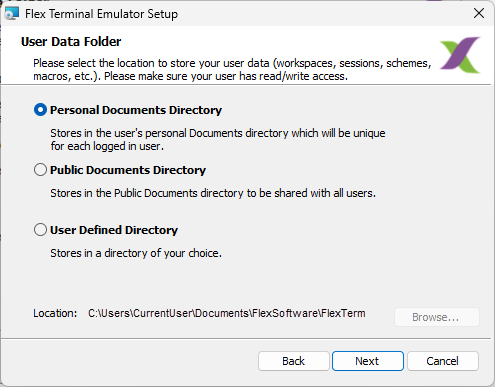
- Press Next to accept the default location (recommended) for the User Data Folder:
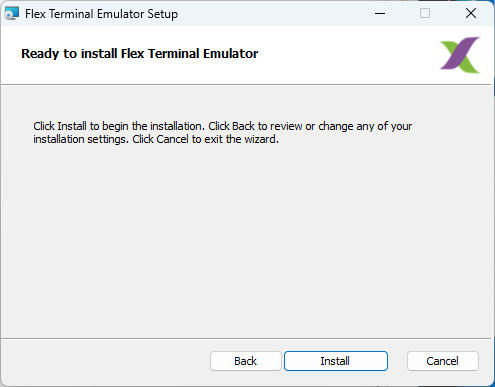
- Press Install to begin the installation:
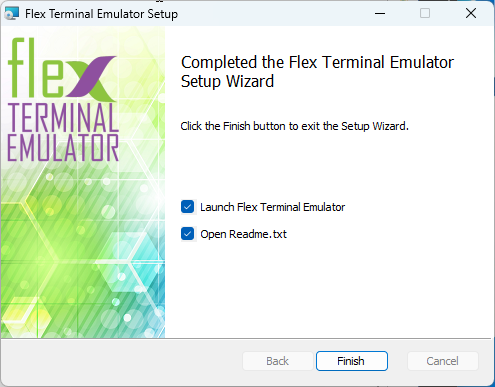
- When setup has completed, uncheck either option, then press Finish:
Create your first Flex Terminal Emulator Workspace and Host Session
- From the Windows Start button, locate the Flex Terminal Emulator program group, press to expand, then select the Flex Terminal Emulator application to start.
- The first time you start Flex Terminal Emulator, you will be presented with the New Session Wizard dialog, which will guide you through the process.
- First choose the type of host you will be connecting to, either IBM Z (TN3270), IBM System i (TN5250) or VAX/VMS/Unix (VT/SCOANSI/Wyse) and press Next.
- If IBM Z (TN3270) or IBM System i (TN5250) was selected in step 3, you will also be prompted to choose a Session Type. Select Display to create a display session, or select Printer for a TN3270 or TN5250 printer session and press Next.
- Enter the Host Name or IP Address and TCP port for the host you are connecting to.
- If VAX/VMS/Unix (VT/SCOANSI/Wyse) was selected in step 3, you will also want to select the appropriate Operating Mode to match the host system.
- If necessary, enable encryption and any optional parameters and press Next.
- Review the Configuration summary, then press Finish to save your settings and connect the session with the host, or optionally press Setup to further customize the session.
Note: the above procedure will automatically create the default workspace file named Flex.aws and a default session named Flex.aha. Subsequent launches of the Flex Terminal Emulator application will, by default, open the Flex.aws workspace with the Flex.aha session inside.
Starting Flex Terminal Emulator Sessions
Any of the following methods may be used to start a Flex Terminal Emulator workspace, containing one or more sessions:
Windows Start Menu
From the Windows Start button, locate the Flex Terminal Emulator program group, press to expand, then select the Flex Terminal Emulator application to start. This will automatically start the default Flex Terminal Emulator workspace file named Flex.aws and any sessions configured to open within the workspace.
Windows Explorer
Navigate to the Flex Terminal Emulator install folder, which by default is C:\Program Files\FlexSoftware\FlexTerm\ and double-click the file Flex.exe.
Specific Workspace
Once you have one or more Flex Terminal Emulator workspace files created, with one or more sessions configured, you may open these directly by double-clicking the workspace file name, for example Flex.aws.
Save Workspace Shortcut to Desktop
Use the File >Save Workspace>Save Workspace Shortcut to Desktop menu command to create a shortcut for the current Flex Terminal Emulator workspace. Double-click the shortcut to start that specific Flex Terminal Emulator workspace.
Multiple Flex Terminal Emulator Sessions
After you have created your first Flex Terminal Emulator workspace, additional sessions may be added using one of the methods below:
File>New Session
This menu command will prompt the user for the name of a new session, or an already configured session to add. Either type the name of a new session to create/configure, or choose from the list of existing sessions.
Note: only one instance of a session may be added to a workspace. If you select a session that is already a member of the workspace, that session will be given focus within the workspace. If the desired outcome is to have multiple sessions to the same host, simply create a new session using the same connection parameters, then add to the workspace.
Add Session  Button
Once two or more sessions have been added to a workspace, the sessions will appear as tabs along the top of the session window. The Add Session button will display to the right of the session tabs and serves the same purpose as the File>New Session menu command.